Building a Whimsical Cupcake Mountain Around My Cotton Candy Tunnel Adventure
- Brittany
- Sep 1
- 3 min read

Updated: Sep 8
Creating a whimsical landscape is both a fun and rewarding experience. Imagine riding a train through a tunnel made of cotton candy, surrounded by fluffy cupcake mountains! Sounds enchanting, right? I was inspired to design a cupcake mountain to complement this sugary tunnel, and the process turned out to be as exciting as the end result. Join me as I share the steps and details that brought my cupcake mountain to life.
The Foundation: Starting with Styrofoam
To start my cupcake mountain project, I gathered large sheets of Styrofoam from a DIY kit, which I bought at Home Depot for about $12. Not only did I create an impressive structure, but I also had leftovers for future projects.
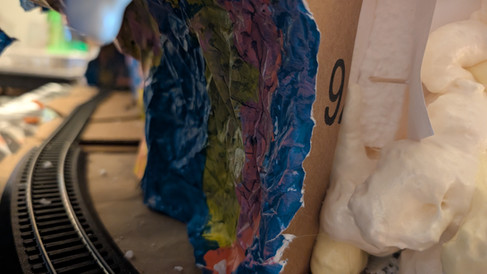
I used toothpicks to affix the Styrofoam sheets to my cotton candy tunnel, ensuring a solid base. This foundation was vital, as it set the stage for the upcoming cupcake mountain.
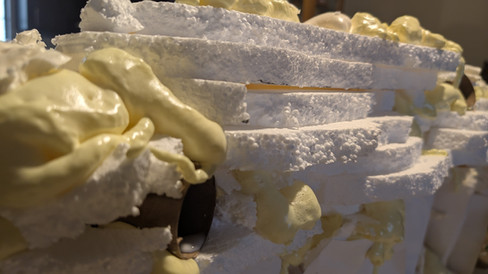
Next, I applied Great Stuff spray foam, available for around $6 at Home Depot. This foam served to solidify my structure and keep everything in place. I used three cans of spray foam with different expansion rates: some expanded 1 inch, others 3 inches, and a few expanded up to 5 inches. The variety gave my foundation interesting texture and depth. After letting it dry for 24 hours, I was ready for the next phase.
Crafting the Cupcake Base
With the foundation secure, I began creating the cupcake’s base. I folded paper into triangularly cupped shapes and filled them with spray foam to achieve a stable yet whimsical look. This step was crucial for getting the right shape and character for my cupcake mountain.
Once the "cup" was made, I focused on the "cake" structure. I layered more Styrofoam from my DIY kit, securing each layer with toothpicks and wood glue. Be cautious with your glue choices; some can damage Styrofoam, so I selected one that was safe.
To enhance the whimsical aspect, I topped the layers with additional spray foam, creating a fluffy frosting- terrain texture. This combination not only formed a realistic cupcake shape, but it also made my mountain visually appealing.
Adding the Frosting Caves
One standout feature of my cupcake mountain was the addition of toilet paper tube tunnels at the top, resembling frosting caves. These tunnels added depth and created a fun exploration element for anyone hiking or exploring the cupcake mountain.
To achieve a mountain-like terrain, shaping the Styrofoam layers was vital. I carefully carved and molded the foam, creating peaks and valleys to ensure the overall look was both whimsical and believable.
The Next Steps: Plaster and Substrate
As I progressed with the cupcake mountain, I recognized the need for plaster and substrate for finer detail. This step will be essential for bringing the mountain to life, allowing me to create textures and colors that mimic an actual cupcake.
Keep in mind the importance of visual consistency. Even if the tunnel was built first, it should appear as though it was carved from the mountain. This attention to detail enhances the realism of your whimsical landscape.
A Sweet Adventure Awaits
Building my whimsical cupcake mountain around the cotton candy tunnel has been an exciting creative journey. From the initial Styrofoam foundation to the fun frosting caves, every step filled me with joy and imagination.
As I look forward to adding plaster and substrate, I can't wait to see my cupcake mountain evolve into a vibrant landscape. Whether you’re an experienced DIY enthusiast or someone who simply loves fun designs, I hope my adventure inspires you to create your own magical spaces.
Rem
ur imagination. Gather your materials, unleash your creativity, and embark on your own sweet adventure!


Comments