Creating Realistic HO Scale Trees for Autumn Apple Orchard Layouts
- Brittany
- Oct 6
- 3 min read

Fall is in the air, and nothing captures the essence of autumn like a visit to an apple orchard. The vibrant colors of the leaves, the crisp scent of fresh air, and the tantalizing fragrance of ripe apples create a picturesque setting for your model train layout. Adding trees to your HO scale layout not only enhances the seasonal charm but also adds depth and dimension to your scenes. In this post, we’ll guide you through the straightforward process of making your own HO scale trees using common craft materials. Let’s jump right in!

Supplies You’ll Need
Before starting your crafting adventure, gather the following materials:
Floral wire or 28-gauge copper wire
Toothpicks
Green and brown floral tape or paint
Foliage (foam, clump foliage, or moss)
White Glue and Hot Glue
Wire cutters
Pliers
Tweezers
A 3x3” tile or sturdy cardboard
Having everything at hand will ensure a smoother and more enjoyable crafting experience.
Pre-Tree Apples
To add realism to your apple trees, let’s make some tiny apples! Roll Sculpey clay into small balls, cut them in half, re-roll, and then bake at 275°F for about 3 minutes. After they cool, paint them in shades of red, green, or yellow to imitate real apples. For example, utilizing different shades results in a more realistic look, enhancing the believability of your orchard scene.
Step 1: Creating the Trunks
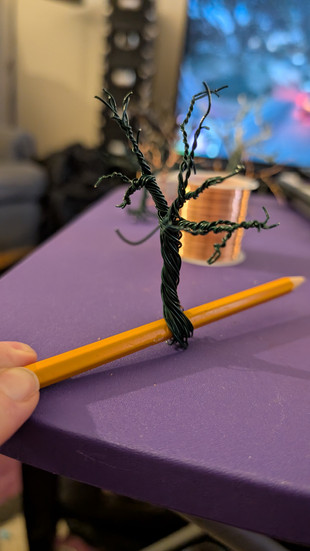
Now, let’s dive into making the tree trunks! Take your floral wire and wrap it around a tile about 15 times. Cut one end to form a “V” shape, then twist the wire around a pencil to create the trunk. For added strength, insert a toothpick into the base. Keep in mind that using thicker wire results in rugged trees (perfect for a Halloween scene or Haunted Forest layout), while thinner wire will maintain a scale-accurate look. Adjust the height as desired, use pliers to keep twists tight.
Step 2: Adding Branches & Roots
Next, it’s time to shape the branches and roots. Spread the wire ends to create branches, ensuring they are arranged asymmetrically for a more organic appearance. Start with a split of two main stems and get smaller from there. When the wire twists are down to 2 that branch is done. If a branch ends in a single wire either fold and twist or cut it off. For the Roots, cut open the base loop and twist the wire to form roots. This is done in the same manner as twisting the branches. If not previously done; position the toothpick for stability. This step is key for achieving a realistic tree structure and enhancing its visual appeal.
Step 3: Barking Up the Right Tree
To give your tree a believable bark texture, wrap the trunk in brown floral tape or coat it with a thin layer of white or hot glue. Hot glue can be tedious but it provides for an instant transition to painting with added 3 dimensional features. Once dried, paint the trunk dark brown and dry brush a lighter brown or gray over it for added depth. If you’re crafting birch trees, paint them white with brown flecks to mimic their distinctive bark pattern, which can be seen on the edges of orchards.
Step 4: Adding Foliage
Now comes the exciting part—adding foliage! Apply glue to the branches and attach clump foliage, layering larger pieces at the bottom and smaller ones at the top for a natural look. Using tweezers will help you position everything precisely. This step will significantly enhance your trees, making them look lush and full, just like the real trees in an orchard. Many crafters opt for spray glue for affixing foliage, but it can be hard to control, white glue will work just as well
Step 5: Finishing Touches
Once you are happy with the foliage, trim any excess and lightly spray the tree with diluted glue to hold everything in place. For a final touch, add a lighter fine turf or static grass to the top of the tree, this gives the illusion of sunlight and shadows. If you're creating apple trees, turn the tree upside down, dab glue on the branches, and attach your mini apples for an authentic orchard feel.
Your Orchard Awaits
Congratulations! Your HO scale trees are now ready to elevate your autumn apple orchard layout. These handcrafted trees not only add seasonal charm but also reflect your personal touch in your model train scenes. Whether you choose to display them in your layout or store them for future use, you can take pride in the time and effort you invested in creating them.
As the leaves shift colors and the air becomes crisp, pause to appreciate the beauty of your miniature orchard. Happy modeling, and enjoy fall’s splendor in your HO scale world!


Comments