From Chaos to Craft: My Whimsical Journey Building an HO Gauge Train Tunnel
- Brittany
- Aug 17
- 3 min read

Building a model train layout is not just a hobby; it is an exciting adventure that merges creativity, engineering skills, and a dash of nostalgia. As a devoted HO gauge train enthusiast, I decided to elevate my layout by constructing a tunnel. What I believed would be a simple project morphed into a chaotic yet fulfilling experience. Join me as I recount my journey of building a tunnel, from my initial struggles with chicken wire and paper mache to the delightful cardboard and paper masterpiece that now complements my layout.
The Ambitious Start: Chicken Wire and Paper Mache
My journey began brimming with ambition and a vision of a lifelike rock tunnel. I planned to use chicken wire and paper mache to craft a robust structure that would echo the ruggedness found in natural tunnels. I gathered my supplies and set off to shape the chicken wire into a tunnel form.
Unfortunately, I quickly faced the reality of working with chicken wire. The material was stubborn and sharp, making it challenging to mold into the desired shape. I found myself struggling to bend and twist the wire, getting covered in sticky paper mache that added to the chaos of my workspace. After several frustrating attempts, I realized my initial plan was not delivering the results I had hoped for and would require more work than I could manage.
To illustrate, after spending three hours wrestling with the wire, I had only managed to create a structure that was lopsided and ineffective. The mess it created made it feel more like a disaster zone than a crafting area.
A Change of Plans: Embracing Cardboard
Feeling a bit overwhelmed yet determined not to give in, I took a step back and reassessed my approach. I wanted a simpler, more manageable solution. That was when I decided to switch materials and utilize cardboard for the primary structure of my tunnel.
Cardboard turned out to be not only easier to work with but also provided the necessary support I needed. I cut out several pieces to form the basic shape of the tunnel, ensuring it fit seamlessly into my train layout. This new approach made the process smoother, and with each piece added, my excitement grew as the tunnel began taking shape.
For anyone considering a similar project, I recommend cutting the cardboard into incremental pieces instead of trying to shape a large section at once. This allows you to better manage the design and see progress more quickly. By the end of this phase, I had a well-structured tunnel ready for its details.
Adding the Finishing Touches: Paint and Mod Podge
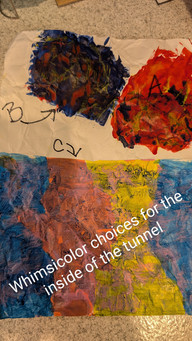
With the structure complete, it was time to infuse my vision with color. I selected whimsical shades to emulate the look of cotton candy, applying them in layers for depth and realism. Watching the transformation was like magic; the once-plain cardboard morphed into a rugged tunnel reminiscent of a wild fantasy environment.
To protect my paintwork and add a matte finish, I layered Mod Podge over the entire structure. This not only sealed the paint but also gave my tunnel a delightful texture. Upon completion, I felt it was vital to enhance certain areas with additional paint to create realistic shadows and highlights, which ultimately added character and depth.
The final result was nothing short of whimsical. The cardboard and paper tunnel became a charming addition to my HO gauge train layout, all while being easy to manage and maintain. Surprisingly, the entire construction took about five hours from start to finish, showcasing how a change in strategy can yield excellent results.
Lessons Learned: Embracing Creativity and Flexibility
Looking back on my journey, I learned significant lessons about creativity and flexibility. Sometimes, the first plan may not yield the expected results, and that is perfectly fine. Being open to new approaches can lead to unexpectedly delightful outcomes.
The frustrations I experienced with chicken wire and paper mache pushed me to explore alternative materials and techniques. By allowing myself the freedom to adapt my plans, I was able to create something genuinely special. This experience taught me that sometimes, taking a step back can be as valuable as pushing forward.
A Whimsical Addition to My Layout
Ultimately, my whimsical journey of building an HO gauge train tunnel was filled with challenges, but each one was worth it. The cardboard and paper tunnel not only enhances the visual appeal of my train layout but also serves as a testament to the creative process.
If you are thinking about building a tunnel for your model train setup, I encourage you to embrace the challenges and explore different materials. Whether you opt for cardboard, paper mache, or something entirely different, the most important element is to enjoy the journey.
Happy crafting, and may your model train adventures be as whimsical and wonderful as mine!


Comments