The Fall Finale: Bringing Your Halloween Scene to Life with Arduino
- Brittany
- Oct 27
- 9 min read

Halloween Is Here!
We've arrived at Halloween week! I can sense it in the air... mischievous little boys and ghouls eager to play tricks on unsuspecting neighbors, and the excitement of the doorbell ringing on that destined night!
I recall the smell of jack-o’-lanterns from my childhood (when real flames were still used). It was the scent of warm pumpkin drifting up and down the street. Some people got creative, adding cinnamon or chives to the pumpkin lid, enhancing the aroma to be even more enchanting—like a warm pumpkin pie fresh out of the oven at Thanksgiving.
I remember the crisp fall air biting at my cheeks and nose as a young trick-or-treater, the fun Halloween books we read, and the spooky ghost stories we shared. I remember watching The Nightmare Before Christmas line by line, absorbing every detail.
Now it’s our turn to create new memories, inspire creativity, and ignite curiosity in the next generation. It’s time for interactive miniature Halloween displays—magical little worlds that enchant, inspire, and bring the spirit of Halloween to life!

The Mechanics Behind the Magic
Last week, we delved into the build—all the creative elements that bring a fall scene to life. This week, we’re focusing on the mechanics that make it truly enchanting. Consider it a behind-the-scenes look: lights flicker, sounds emerge, and small effects come alive—all managed by a few ingenious components and some electrical expertise.
What We Used:
Buttons & wood (or thick cardboard)
Glue & tape
LEDs & resistors
Power supply & Arduino/microcontroller
Breadboard & jumper wires
Wire & wire cutter
Servo motor
Voltmeter
Paint
Sound module
Extra Special Halloween Effects:
Tri-fold poster board
Cardstock
Vellum paper
With these components, you can begin making your diorama interactive. Buttons activate lights and sounds. LEDs flicker and shine. A servo can make a witch fly across the sky. For a Halloween touch, we layered vellum, cardstock, and poster board to create lightning effects, glowing windows, or the eerie full moon silhouetting a wolf's howl.
The magic arises not just from the components themselves, but from how you time and combine them. A flicker here, a gradual light there, a sound effect perfectly timed—suddenly, your diorama comes alive, ready to captivate both children and adults.

Bringing the Magic to Life
Do you remember the scene in Mary Poppins where they leap into the sidewalk chalk drawing? That's the type of magic I aim to create—small moments that captivate both children and adults, filling them with wide-eyed wonder. Through interactive dioramas, we can spark imagination, creativity, and even a touch of playful bravery.
We aim for a Halloween experience that is spooky but not scary. When little ones press a button, they might see a flicker of lights or hear a playful sound that startles them just enough to laugh—reassuring them it’s all in good fun. As they grow more confident, they press more buttons, exploring and uncovering the scene.
Older siblings might initially dismiss it—“This is lame”—until the younger ones unintentionally activate something spectacular: a wolf howling at a full moon, the moonlit sky slowly turning a foreboding red. Suddenly, the older child exclaims, “Cooooool!” The younger one proudly responds, “Yeah! Cool!” And just like that, magic unfolds.
In small dioramas, creating true movement can be challenging, but well-timed lights and sounds can give the illusion of life. A flickering light can suggest motion. A gradually brightening moon can imply dramatic change. In our scene, we’ve included:
Lighting effects: a movie screen glows, house lights turn on, a fire crackles.
Special Halloween effects: lightning flashes and the wolf howls at the full moon.
Limited motion: a witch flies across the scene using a servo motor.
Adding more moving parts might require an additional Arduino board, but our aim isn’t just motion—it’s to ignite imagination. Even subtle effects, when timed right, can spark a child's wonder and leave them carrying that magic as they eagerly head to the next house.

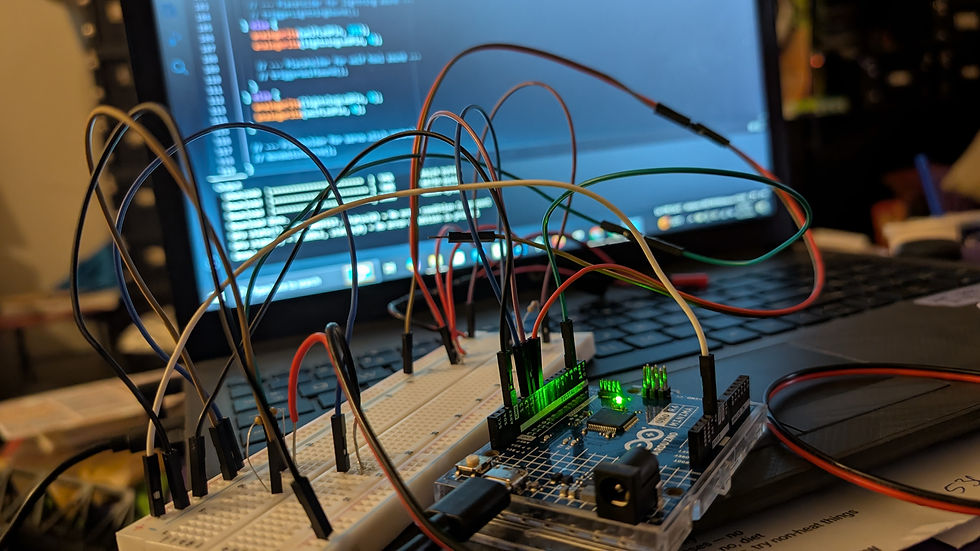
Circuits Made Simple (and Fun!)
We aim to inspire everyone to dive in and get hands-on, whether you're a beginner in electronics or a bit apprehensive about soldering and wiring. Let’s explore two levels of magic:
The Simple Idea
Button → Light & Sound Even the smallest setup can captivate children. Press a button, a light illuminates, a sound plays—instant magic!
The Enhanced Idea
Button → Arduino → Light with Action & Sound Module Here’s where you elevate the experience. Picture five buttons connected to five pins on the Arduino. Each button activates its unique LED and sound effect.
Expert Tips From My Project:
Button Wiring:
Connect one leg of each button to a 10k resistor leading to ground. This “pull-down” resistor ensures the Arduino consistently detects the button press. After testing several methods, this proved to be the most reliable.
LED Wiring:
Utilize four Arduino pins for LEDs, each with a 220–470Ω resistor. This safeguards the current and prevents the LEDs from burning out.
Sound Module:
Dedicate one pin exclusively for the sound module. This allows lights and sound to activate independently without interfering with each other.
Wire Challenges:
I used stranded wire, which doesn’t always fit well in a breadboard. My solution: attach a jumper wire to the stranded wire. This extended my reach for buttons or LEDs without compromising circuit integrity.
Even with a simple circuit like this, the impact can be significant. A perfectly timed light flicker, the right sound, and some interaction can make kids gasp, laugh, and press more buttons, discovering magic at every turn.


Step-by-Step Build: Bring Your Scene to Life
If you're a beginner in electronics, don’t worry—this guide will help you make your diorama interactive without feeling overwhelmed.
Step 1: Prepare Your Components
Arrange your buttons, LEDs, resistors, Arduino, jumper wires, breadboard, and sound module.
Organize items by type for easy access.
Step 2: Wire the Buttons
Attach one leg of each button to a 10k pull-down resistor and then to ground.
Connect the other leg to a digital input pin on the Arduino.
Optionally, label the pins in your notebook to identify each button's function.
Step 3: Wire the LEDs
Connect Arduino output pins to LEDs using 220–470Ω resistors.
Allocate one pin for your sound module to prevent interference between lights and sound.
If using stranded wire, connect it to jumper wires for easier breadboard connections.
Step 4: Organize Your Breadboard
Designate sections for different tasks:
Lower left for button resistors
Upper left for LEDs A & B
Upper right for LEDs C, D & E
Begin small with one button and one LED, then expand gradually.
Step 5: Program Your Arduino
Launch the Arduino IDE.
Start with a basic sketch: make an LED blink when a button is pressed.
After success, incorporate more complex effects: fade lights, trigger sound, or move a servo.
Test frequently as you add components to minimize frustration.
Step 6: Safety & Tidiness
Keep wires organized; use tape or cable ties if necessary.
Secure batteries or power supply to avoid accidental shorts.
Verify connections before powering up.
Use a multimeter for troubleshooting voltage or continuity issues.
Stay Organized & Troubleshoot Like a Pro
With numerous wires connected to the Arduino, it can be easy to become confused, particularly if this is your first electronics project. A bit of planning can make a significant difference!
Tips for Keeping Your Breadboard Tidy:
Assign sections of the breadboard to specific tasks. For example:
Lower left: all the button resistors
Upper left: LEDs A & B
Upper right: LEDs C, D, & E
Bottom right: sound and servo
If you’re new to wiring, start small. Begin with one button and one LED, test it, and then gradually add more components.
Take a deep breath. Electronics can be finicky, but patience pays off.
Always consult your multimeter if something isn’t working as expected. Checking continuity and voltage can save hours of frustration.
Through some organization and methodical testing, even a tangled mess of wires can transform into a magical, interactive Halloween display that captivates both children and adults.

Bringing the Scene Together
Once the wiring is finished, the Arduino programmed, and all connections verified, it's time for the installation!
I suggest beginning with a flat piece of cardboard—imagine it as a pizza peel. If your base is already set up, you can gently lift the Arduino, the breadboard, and your "plate of spaghetti" wires, and carefully position it in your base. Alternatively, if you're constructing around a cardboard base, this can serve as the foundation for everything.
Next, install the buttons. It might seem a bit unconventional, but I haven’t soldered anything yet—everything is connected using jumper wires and electrical tape. This setup is temporary since I have a limited number of Arduinos.
Button Installation Tips:
Drill holes for the buttons. Hold the button housing in front of the drill bit—if you can see the bit around the button, it's too large.
Disconnect one button from the breadboard at a time, feed its wires through the hole, then reconnect it.
Test each button as you proceed—you can never test too much, especially when it's this enjoyable!
After all buttons are installed, I glued the board with the buttons to a second piece of foam (painted black) with a large hole in the center. This allows for easy movement of the diorama and wires.
Next, carefully position each LED where it belongs, ensuring not to "cross the streams." Once everything is in place, conduct a final test before gluing the diorama components in place. I'm using only white glue to attach the diorama to the foam so it can be separated later if needed.


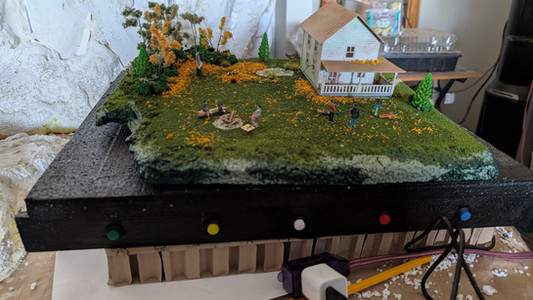
Bringing the Magic to Life
The scene is now vibrant and animated!
Button 1: A flickering fire pit where a small family is roasting marshmallows.
Button 2: A projector displaying flickering scenes—watch a young man relaxing among the leaves, enjoying Halloween.
Button 3: A light in the house where a young ghoul converses with her beastly friends about her Halloween haul.
Button 4: A witch flying across the scene on a servo motor.
Button 5: A random choice between two Halloween effects—lightning striking or a wolf howling at the blood-red moon.
All of this is tied together with a playful rhyme: "I spy a ghost drifting near the trees..."
I’m excited to see the special effects you’ve added to your own setup! Did you include critters? Unique sound effects? Fun Halloween surprises? Comment here, or share your photos on Facebook or Instagram.
WhimsiTrack is eager to see all your creative innovations—show us how your imagination brought your diorama to life!
Keep the Magic Going
I hope I've inspired you or helped you conquer the "scary monster" of wiring projects! Halloween can be a blast when we support each other (and when we keep our TP and eggs to ourselves, lol).
Are we ready for Halloween to vanish as quickly as it arrived? Absolutely not! I'd keep my Halloween decorations up all year if I could. But as we prepare for our final scare of the season, think of all the exciting projects awaiting us for the rest of the fall!
I'd love to see your creations—share photos of your fall layouts (or any layout, really) with @WhimsiTrack and tag them #FallLayout. Let's keep the magic alive and inspire each other throughout the season!
Arduino Code
Want to try this build yourself? Drop a comment or message @WhimsiTrack on Instagram, and I’ll share the Arduino code with you!
//Feel free to copy, modify, and experiment with this example code, but make sure to change your pin numbers to align with your setup!
// Example: Button triggers light and sound
int buttonPin = 2;
int ledPin = 9;
int soundPin = 10;
void setup() {
pinMode(buttonPin, INPUT_PULLUP);
pinMode(ledPin, OUTPUT);
pinMode(soundPin, OUTPUT);
}
void loop() {
if (digitalRead(buttonPin) == LOW) {
digitalWrite(ledPin, HIGH);
digitalWrite(soundPin, HIGH);
delay(500);
digitalWrite(ledPin, LOW);
digitalWrite(soundPin, LOW);
}
}


Comments