Fall Family Fun in Miniature
- Brittany
- Oct 20
- 9 min read

Updated: Oct 25
Full Series Overview 🍁🏡
Welcome to the full series of building a cozy, interactive fall diorama in HO scale! Whether you’re a beginner or an experienced hobbyist, this step-by-step guide will walk you through everything from the initial inspiration to the final interactive touches.
Series Map:
Part 1: The Vision & Foundation Discover the inspiration behind the scene, gather materials, and start shaping the base. Learn how personal memories and seasonal magic can guide your miniature world.
Part 2: Building the House & Yard Construct the house, create a natural yard, and add trees, shrubs, and terrain textures. Tips for realistic slopes, camouflage painting, and landscaping order.
Part 3 & 4: Adding the Fun Details & Water Feature Magic Bring the scene to life with pumpkins, leaf piles, a backyard movie night, and a koi pond. Learn creative hacks like rice koi and bats, miniature fire pits, s’mores, and cornhole setups.
Part 5: Simple Wiring Made Easy Add lights to your house and fire pit with beginner-friendly wiring. No soldering required! Step-by-step instructions and tips for resistors, LEDs, and batteries.
Part 6: Bringing the Scene to Life & I Spy Finish with figures, playful details, and an interactive I Spy game.
Crafting Miniature Fall Family Adventures
Part 1: The Vision & Foundation
Inspiration 🍁
I miss my family. My dad owns a two-story house in the Chicago suburbs, surrounded by large maple trees. In the fall, these trees display stunning red and orange hues, and the leaves fall so densely that you don't even need a rake — you can simply kick or push them into perfect piles for jumping.
I could spend countless hours in that backyard, lounging among the leaves with endless time to ponder and marvel at amazing things. Autumn also brought neighbors together for cocoa and s’mores, backyard games, and weekend projects like chopping wood for the fireplace to sustain us through the winter.
I aimed to encapsulate the essence of cozy autumn days, a warm home, and uncomplicated family enjoyment in a smaller scale.
Planning (or… lack of it!) 🏡
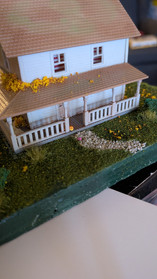
Honestly, this project began without much of a plan. I wanted to do some wiring, so I naturally thought of "house" and "fire." I chose a charming two-story house with a wraparound porch in HO scale (since that was available) and promptly began aging its spotless white plastic.
To create a weathered look, I scraped green and brown pastels into dust and applied them to simulate typical wear and tear, along with the mildew that appears on siding during the damp fall season. It's an easy technique, but it significantly enhances realism.
Inside, I used black electrical tape to section off a part of the house. While many hobbyists choose to cover the entire interior with black paper, I opted to block off only one "room." This approach allowed the warm glow from inside to not overpower the rest of the autumn-themed scenes outside.
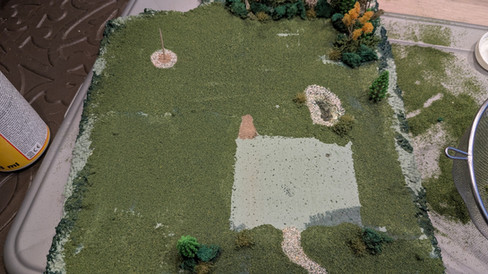
Ultimately, I selected a piece of Styrofoam large enough to accommodate several mini-scenes while maintaining the feel of a unified yard. Most of the materials were sourced from items I already had at home, but a few exceptional features prompted me to purchase some essential products (which I’ll reveal as the project progresses).

Part 2: The House & Yard
Shaping the Land 🌳
The initial step involved shaping the base to look more natural. I trimmed the edges of the Styrofoam into a gentle slope rather than a steep drop-off. This is a straightforward step, but it significantly enhances realism.
After shaping the Styrofoam, I applied two shades of green in a camouflage pattern. I suspected (correctly, as it turned out) that this uneven underpainting would give the grass a more realistic appearance — since no lawn has perfectly even, golf-course-like turf.
Before proceeding, I marked the location for the house. This allowed me to rotate and move the foam without risking harm to the delicate structure.
Trees, Shrubs & Overgrowth 🍂
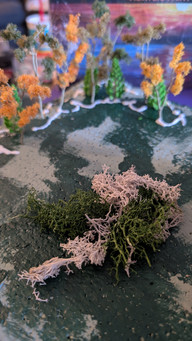
I bought a set of autumn-colored trees at Hobby Lobby for around $8. They were smaller than what I could easily create myself, and I didn't even use the entire pack — leaving extras for another project! After arranging them along the property line, I added lichen and large, spongy bushes to fill the space, giving it an overgrown, slightly eerie atmosphere.
In landscaping, I begin with the largest components and proceed to the smaller ones:
trees → shrubs → grass → dirt.
Grass, Dirt & Rock Details 🌱
I applied Mod Podge with a 1-inch paintbrush in sections and scattered scenic turf to create the grass. By dividing the work into quarters, I maintained control over the coverage and prevented patchy bare areas.
To enhance realism, I created a small dirt path near the back door, simulating an area of "heavy foot traffic" where grass would naturally wear away in a real yard. For the sections with the fire pit and koi pond, I positioned rocks before adding grass, securing them with Mod Podge to ensure they appeared integrated into the landscape rather than simply resting on it.


Part 3 & 4: Adding the Fun Details & Water Feature Magic
Taking It Slow, Section by Section
Details bring a scene to life, yet they can sometimes feel daunting. To avoid rushing, I took my time and focused on one section at a time. Each small detail became an opportunity to infuse the layout with story and character.
Movie Night Under the Trees 🎥🌙
Initially, I planned to create a large pile of leaves near the tree line for jumping into. However, a spontaneous idea evolved into an amazing plan: how about an outdoor movie night?
As it's fall, I was looking for something cozy and Halloween-themed that would still be suitable for families. I decided on Hocus Pocus — a film familiar to most generations. I found an image online, resized it to HO scale using Paint, and printed it to make the “screen.”
To create the projector tripod, I glued two toothpicks in a T-shape, attached legs made of floral wire, and painted everything black. Just like that, we were set for movie night!
The Koi Pond 🐟💧
The pond was excavated, painted, and surrounded by rocks prior to the grass being planted. However, the true enchantment lay in the layering.
I applied black dry-brushing to the lower rocks to add depth.
Small pieces of foliage at the base hinted at pond vegetation.
Resin was layered in increments of no more than 1/8" at a time, requiring extensive overnight drying.
As I immersed myself in my fall project, carefully layering resin and crafting whimsical creatures from rice, I couldn't help but think about the delightful aroma wafting through the air. It was the perfect day for a pumpkin spice latte. Just the thought of that warm, spiced drink made me smile. I remembered last autumn when I had my first sip of the season while working on a similar project. The moment the creamy, pumpkin-flavored goodness touched my lips, I felt an instant wave of comfort and creativity. It was as if each sip fueled my imagination, making the grains of rice transform into vibrant fish and playful bats. The combination of crafting and savoring that delicious latte was a joyful reminder of how the little things can elevate a simple project into a cherished memory.
Fire Pit & S’mores 🔥
The fire pit needed to be installed before laying the grass (since rocks are larger than turf). Once the ground cover was placed, I added a ring of larger stones, securing them using the rubbing alcohol and watery glue technique.
For the fire, I marked the location for an LED with a toothpick and constructed the area around it. The logs were simply twigs from outside.
Of course, no autumn fire pit is complete without s’mores. I crafted a tiny table from cardstock attached to a piece of a McDonald’s straw. The s’mores consisted of miniature cardstock “crackers” and “chocolate” squares, finished with marshmallows — small globs of white paint at the end of floral wire.
Cornhole & Autumn Leaves 🍂
In a previous post in this blog series, I discussed how I constructed a cornhole set complete with beanbags, which turned out to be an ideal backyard game for the side of the house.
The leaves were a discovery from Hobby Lobby, costing $2.50 per pack. Securing them in place was challenging, requiring several applications of spray or drip glue (and a lot of patience) before they naturally adhered.
The Rogue Thoughts Keep Coming… 👻🎃
This project had my creativity in overdrive. During the drying times, I thought: what if this became my Halloween display this year? This sparked the idea of making it more interactive with a game of I Spy.
To enhance this, I added a jack-o-lantern on the front porch, a vellum ghost in the trees, and even a random pink rock. These small details gave the scene a playful twist — something visitors (and readers) would enjoy spotting.


Part 5: Simple Wiring Made Easy
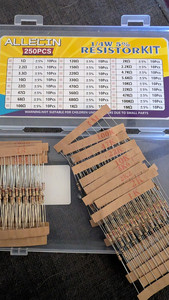
Fearless Wiring (Under $30) ⚡
Wire: $15
LEDs: $6
Resistors: $6.50
Electrical tape: $1.63
Overcoming your fear of wiring: Priceless
Seriously — for under thirty bucks, with no soldering needed, you can definitely do this. Let me show you how.
Placing the LEDs
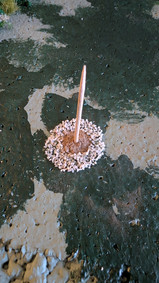
Previously, I used toothpicks to indicate where my LED spots would go. To create space, I used a paintbrush handle (similar in size to the LED) to make holes in the Styrofoam. A crucial tip: always start from the "nice side" (the top) and work your way down to the "rough side" (the underside). This ensures you won't ruin the finished scenery.
Wiring Step by Step
Each LED features two legs, and their distinction is important:
The LONG leg = Positive (Red wire)
The SHORT leg = Negative (Black wire)
If connected incorrectly, the LED will not function and may be damaged.
Each LED gets a small “tail” of wire to provide working space:
Here's how I configured mine:
Connect the long leg (positive) with the stripped red wire by twisting them together. Secure with electrical tape.
Connect the short leg (negative) with the black wire by twisting them together. Secure with electrical tape.
Since I intend to eventually integrate this with an Arduino, I immediately added a resistor to each LED connection:
Strip the wire.
Twist the resistor into the red wire.
Secure it with tape.
Attach the resistor-wire combination to the long leg (positive) of the LED.
Now you have a sequence: LED → Wire → Resistor → Wire, leading to the battery.
For testing purposes, I simply used electrical tape to secure the wires to a 9V battery. Simple and effective.
Choosing Your Components
LED size: 5mm is the standard size, while 3mm is smaller. Either can be used; choose the one that suits your setup.
Wire gauge: Use 18–24 gauge wire. Both solid and stranded types are suitable for this project.
Resistor value: This depends on your LED and battery specifications. Ohm’s Law will help you determine it.
Here’s how I calculated mine:
My LED current: 20mA (which is 0.02 amps).
My battery voltage: 9V.
Formula: V ÷ A = Resistance → 9 ÷ 0.02 = 450 ohms.
The closest resistor in my kit: 470 ohms — ideal.
If math isn’t your forte, don’t worry. Numerous free online Ohm’s Law calculators are available.
Lighting the Scene 🔦
Once the wiring is complete, the next step is to insert the LEDs into the prepared holes. Ensure the wires are tucked underneath to remain hidden. I used small pieces of scrap Styrofoam to support and organize everything.
Just like that, the house illuminates, the fire pit flickers, and the scene comes to life — no soldering, no hassle.
I plan to upgrade this setup to an Arduino project for Halloween, but even in its current form, it works wonderfully.


Part 6: Bringing the Scene to Life & I Spy
The Figures That Tell the Story 🏡🍁
To complete the scene, I included store-bought figures:
A child lounging in the leaves, watching the movie.
Two individuals on a log by the fire, roasting marshmallows.
A young child with a parent, handling the s’mores.
Two people playing cornhole, with a third ready to join as the next player.
It truly captures the essence of a perfect fall day — a glimpse of family enjoyment, cozy and playful, offering just a hint of the magic Whimsitrack can create.
Incorporating the I Spy Game 🔍
This diorama is designed not just for viewing but for exploration. The I Spy game introduces an interactive element, prompting observers to discover tiny surprises hidden throughout the scene.
Some items are easy to find, like pumpkins or the koi in the pond. Others are more discreet — a jack-o-lantern peeking from the porch, a vellum ghost drifting among the trees, or a random pink rock concealed among the leaves. Each detail invites a closer inspection and adds a playful aspect of discovery.
In the future, the I Spy game will be enhanced with buttons that activate effects, adding even more interactivity to the scene. Press one, and something magical occurs — a flickering fire, a glowing house, or another hidden surprise is revealed.
Wrapping It Up 🎨✨
From the initial sketch to the final touches, this fall family fun diorama blends memories, creativity, and hands-on modeling. It's accessible for beginners yet offers detailed complexity for hobbyists who enjoy layering intricacies.
Most importantly, it’s playful. It reminds us that the best miniature worlds aren’t solely about realism — they’re about storytelling, imagination, and a touch of magic.


Comments